To dip nails at home, start by prepping your nails with a good manicure kit. Apply a bonding agent, followed by a thin coat of base coat. Dip your nails at a 45-degree angle into colored powder, repeating for a couple of layers. Next, apply the activator and let it dry. Finish with a top coat for a glossy look. With just a few steps and supplies, you can achieve a stunning finish. There's plenty more to discover!
Key Takeaways
- Gather all essential supplies, including a dip powder kit, manicure tools, and acetone for preparation and removal.
- Prepare your nails by pushing back cuticles and applying a bonding agent for better adhesion.
- Apply a thin coat of base coat and dip your nails at a 45-degree angle into colored powder.
- Apply the activator and allow it to dry for 1-2 minutes before finishing with a top coat.
- Maintain your dip nails by applying cuticle oil regularly and scheduling touch-ups every 2-3 weeks.

AddFavor 576pcs Short Press on Nails 24 Color Glossy Fake Nails Full Cover Solid Color Acrylic Artificial False Nail Tips for Women Girls Nail Art Manicure
- Complete Press-On Nails Kit: 576pcs in 24 glossy colors
- Durable ABS Material: Thick, sturdy, flexible, chip-resistant
- Multiple Sizes Included: 10 sizes for perfect fit
As an affiliate, we earn on qualifying purchases.
What Are Dip Nails?

If you're looking for a long-lasting manicure option, dip nails might be just what you need.
Dip Powder Nails are a unique technique that involves prepping your nails with a base coat, then dipping them into a colored powder. After that, an activator is applied to harden the layers, resulting in a durable finish. You can achieve this with just one coat for a stunning look!
Unlike traditional manicures, dip nails don't require UV light and dry almost instantly, giving you a glossy finish similar to gel nails.
With a wide variety of colors and glitters sourced in the USA, you can easily customize your nails while enjoying a cost-effective solution that lasts two to three weeks without chipping. Additionally, budget management is essential when considering regular nail maintenance to ensure you stay within your financial means.
Benefits of Dip Powder Nails

When you choose dip powder nails, you're opting for a long-lasting finish that can stay chip-free for weeks.
This cost-effective solution not only saves you money on frequent salon trips but also gives you the freedom to achieve a salon-quality look at home.
With their durability and easy application, dip nails offer both convenience and style. Additionally, the process of applying dip nails can enhance fine motor skills as you practice precision and control during the application.
Long-lasting Durability
While many nail options chip and fade quickly, dip powder nails stand out for their long-lasting durability. These nails typically last 2-3 weeks without chipping or peeling, making them a fantastic choice for those who want a reliable look.
The dip powder application creates a thin layer that forms a thick, protective barrier over your natural nails, helping resist damage even with rough handling. With proper application and care, you'll maintain that glossy finish without frequent touch-ups.
Plus, dip nails dry quickly, reducing the risk of smudging or fading. Thanks to a bonding agent and activator, you get a resilient finish that keeps your nails looking polished and intact for longer. Additionally, proper application and care can help minimize damage to your natural nails, ensuring a healthier overall look.
Cost-effective Solution
Not only do dip powder nails offer a stunning finish, but they also present a cost-effective solution for your manicure needs.
By opting for DIY dip nails, you can create beautiful manicures at home for under $50, while traditional salon visits can cost you $30-$70 each time.
With a standard dip powder kit yielding 20 to 30 applications, you'll greatly reduce the cost per manicure.
The durability of dip nails means they last at least two weeks without chipping, cutting down on touch-ups and saving you both time and money.
Plus, you can customize colors to match your mood or outfit, making this method not just economical but also creative and fun. Additionally, the comparative advantage principle of DIY techniques highlights the benefits of resource allocation efficiency, allowing you to maximize your beauty budget.
Why Do Dip Nails at Home?

Why choose to do dip nails at home?
First off, it's cost-effective—most dip nail kits are under $50 and can be used multiple times, saving you from pricey salon visits.
You can complete the process in just one to two hours, making it easy to multitask, like catching up on your favorite show. Plus, you'll skip the hassle of salon appointments and wait times.
With dip nails at home, you can customize your colors and styles however you like.
And let's not forget, dip nails can last for weeks without chipping, giving you a durable finish far superior to traditional nail polish. Additionally, the process allows for color accuracy in your designs, ensuring that the shades you choose appear exactly as intended.
Essential Supplies for Dip Nails

To get started with dip nails, you'll need a few essential tools and nail products.
A dip powder kit is a must, along with a manicure kit to prep your nails.
Don't forget acetone for cleaning up and removing old dip powder when you're ready for a change! Additionally, consider investing in energy-efficient appliances that can help streamline your nail care routine with integrated features for better performance.
Must-Have Tools
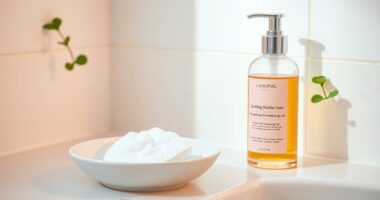
Creating stunning dip nails requires the right tools to guarantee a smooth and professional finish. Start with a dip powder kit that includes essential products like primer, base coat, activator, and top coat. These components work together for a flawless application.
For removing old dip powder, a constant 800rpm Dewalt non-hammer drill or a variable speed rotary tool is a must, ensuring your nail surface is perfectly smooth. Don't forget acetone, cotton balls, and aluminum foil for cleanup and to protect your workspace.
Sanding blocks with 180-grit and 320-grit grits help prep your nail surface for that polished look. Optional items like cuticle oil can enhance your nail care experience, keeping your nails healthy and vibrant. Additionally, using HEPA filtration in your workspace can help reduce airborne allergens, ensuring a cleaner environment while you work on your nails.
Essential Nail Products
Achieving beautiful dip nails relies on having the right essential supplies at your fingertips. Here's a quick list of must-haves to guarantee a flawless application:
| Essential Product | Purpose | Notes |
|---|---|---|
| Dip Powder Kit | Base coat, activator, top coat, and colored powders for customization | Choose your favorite colors |
| Nail File | Shapes and smooths nails before and after application | Use 180-grit and 320-grit |
| Cuticle Stick | Manages cuticles for clean nail beds | Stone cuticle sticks are best |
Don't forget acetone! It's crucial for removing old dip powder and cleaning your tools. Additionally, maintaining delicate skin is important when applying products such as acetone around your nails. With these supplies, you'll be well on your way to perfect dip nails!
Preparing Your Workspace for Dip Nails

Setting up a clean and organized workspace is essential for a successful dip nail process. To guarantee you're fully prepared for dip nails, follow these steps:
- Protect Your Surface: Use aluminum foil to shield your table from acetone spills, and lay an old towel over it for extra absorption.
- Gather Supplies: Collect all necessary items, including acetone, manicure kits, dip powder kits, and sanding blocks, and keep them within easy reach.
- Secure Your Tools: Use a vice to stabilize your drill, and zip-tie the trigger for consistent operation at a controlled speed.
- Ventilate the Area: Make sure your workspace is well-ventilated to minimize inhaling acetone fumes during your nail care process. Additionally, consider using home security systems to ensure a safe environment while you focus on your nail care.
With these preparations, you're ready to plunge into dip nails!
Step-by-Step Process for Applying Dip Nails

To apply dip nails effectively, you'll need some essential tools and a solid preparation routine.
Start by prepping your nails to create the best surface for the dip powder.
Then, follow the application and finishing techniques to achieve a stunning result. Additionally, ensure your nails are healthy by considering the use of essential oils for hair growth to promote nail strength and overall health.
Essential Tools Required
Before diving into the dip nail application process, it's crucial to gather the essential tools that will guarantee a smooth and successful experience.
Having the right supplies on hand makes all the difference during your nail journey. Here's what you need:
- Dip Powder Kit – This includes the base coat, activator, and top coat.
- Nail Files – For shaping your nails and smoothing the nail surface.
- Nail Buffer – To guarantee a perfectly smooth finish before applying nail powder.
- Cuticle Stick – To push back cuticles and maintain clean edges.
With these essential tools ready, you're set to start applying nail powder efficiently and effectively for stunning results!
Nail Preparation Steps
With your tools gathered, it's time to focus on nail preparation, which is essential for a flawless dip nail application.
Start by pushing back your cuticles and using a nail file to create a rough texture on your nail plate. This step enhances adhesion and helps the dip powder stick better.
Next, sanitize your nails thoroughly with isopropyl alcohol or a nail prep solution to remove oils and impurities.
After that, apply a bonding agent (Step 1) to all your fingernails, ensuring even coverage.
Follow up with a thin coat of base coat (Step 2) on the entire nail surface, avoiding the cuticle area to prevent lifting.
This solid preparation sets you up for successful dip nail application!
Application and Finishing Techniques
Start the application of dip nails by ensuring your nails are prepped and ready. Follow these steps for a flawless finish:
- Apply a thin coat of Step 1 Bond to your entire nail surface for proper adhesion.
- Next, use Step 2 Base Coat, avoiding cuticles, and immediately dip your nail at a 45-degree angle into the colored powder. Tap off excess powder.
- For ideal coverage, repeat the dipping process for one layer to second layer, ensuring each layer is thin and even.
- After your final dip, apply Step 3 Activator and let it dry for 1-2 minutes.
Finish with a top layer of Easy Dip Top Coat, allowing it to dry thoroughly for 10-15 minutes for a gorgeous, long-lasting manicure.
Techniques for Smoothing Dip Powder

To achieve a flawless finish when smoothing dip powder, it's vital to use the right techniques and tools. Start by using a drum sander to gently smooth the top layer of dip powder, applying even pressure to protect the nail surface.
Once you've completed the initial sanding, follow up with 180-grit sanding blocks to refine the shape and eliminate any visible imperfections. Next, switch to a finer 320-grit sanding block to achieve that smooth finish, preparing your nails for polish.
Remember to sand in a circular motion to effectively eliminate voids and create a seamless surface. Always dust off the sanding residue between layers to maintain cleanliness and improve the adhesion of subsequent products.
Applying the Top Coat for a Perfect Finish

After ensuring your dip powder is perfectly smoothed, applying the top coat is the final step to achieve that salon-quality finish.
Follow these tips for the best results:
- Use quick, thin strokes to apply the top coat, ensuring an even and glossy finish.
- Apply two coats of top coat for enhanced durability and shine; allow each layer to dry for 10-15 minutes without touching.
- Monitor your brush during application; switch to Brush Softener if it starts to harden.
- After the top coat, consider adding cuticle oil to nourish your nails and elevate your nail art.
These steps will give your manicure a stunning, professional look, making your nails stand out beautifully!
Tips for Maintaining Your Dip Nails

While enjoying your stunning dip nails, it's essential to keep them looking fresh and vibrant. Regularly apply cuticle oil to keep your nails and surrounding skin moisturized, preventing dryness and peeling.
Avoid using your nails as tools for opening packages or doing heavy-duty tasks, as this can cause chipping or breaking. Limit exposure to harsh chemicals and prolonged water contact, especially during dishwashing, to preserve the dip powder finish.
Schedule regular touch-ups every 2-3 weeks to fill in growth gaps and keep your manicure polished. Additionally, gently file and buff the surface of your dip nails weekly to smooth out imperfections and maintain a glossy finish.
With these tips, your dip nails will stay gorgeous longer!
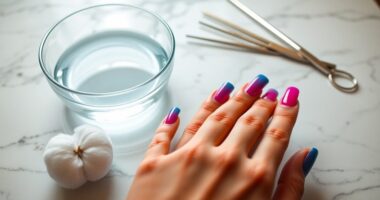
How to Remove Dip Nails Safely

When you're ready to remove your dip nails, follow a few simple steps to do it safely and effectively.
Here's how you can do it:
- File the top layer of the dip powder with a coarse nail file to break the seal.
- Soak cotton balls in 100% acetone, place them on each nail, and wrap your nails in aluminum foil for 5-10 minutes.
- Gently push the softened dip powder off your natural nail using a cuticle pusher or orange stick.
- Moisturize your nails and cuticles with cuticle oil to restore hydration after the removal process.
Frequently Asked Questions
What Are the Steps to Dip Nails?
To dip your nails, start by prepping them with filing and buffing.
Apply a bond aid for better adhesion.
Next, paint a thin base coat on each nail and dip at a 45-degree angle into colored powder, tapping off excess after each dip.
Repeat this process 2-3 times for desired thickness.
After that, use an activator and let it dry.
Finally, shape, buff, and apply a top coat for a glossy finish.
Are Dip Nails Better Than Gel?
When you're comparing dip nails to gel, it really depends on what you want.
Dip nails typically last longer and are less damaging to your natural nails, while gel nails offer a glossier finish.
If you're looking for a cost-effective option, dip nails might be the way to go, especially for at-home application.
Ultimately, consider your priorities—durability versus shine—and choose the option that best fits your lifestyle and preferences.
Do You Need an UV Lamp for Dip Powder Nails?
Did you know that 50% of people prefer dip powder nails over gel for their quick drying time?
You don't need a UV lamp for dip powder nails, as they harden instantly when the activator's applied. This makes the process simpler and more convenient, especially for at-home application.
Plus, you can shape and finish your nails immediately without worrying about UV exposure, making dip powder an appealing alternative for many.
Do You Use Activator After Every Dip?
No, you shouldn't use activator after every dip.
It's best to apply it only after you've completed all your color dips, usually 2-3 coats.
Using the activator too often can make your nails look bulky and uneven.
The activator needs to dry completely before you put on the top coat, ensuring a glossy finish and preventing smudging.
Stick to this method for a smooth, long-lasting result!
Conclusion
In the world of nail care, dip nails shine like a diamond—durable, vibrant, and oh-so-stylish. By following the steps we've laid out, you can master the art of dip nails at home and enjoy long-lasting beauty at your fingertips. Remember to keep your workspace tidy and your nails well-maintained for that salon-fresh look. With practice and patience, you'll create stunning dip nails that'll have everyone asking for your secret!