To upgrade your space with a boho pendant lamp, start by turning off the power and removing your old fixture carefully, inspecting the wiring. Choose a new pendant with textured or natural materials like rattan, and verify the electrical box supports the weight. Securely mount the fixture, connect the wires properly, and adjust the height for visual balance. Proper leveling and testing will give you a stylish, safe upgrade—keep going, and you’ll discover all the steps to complete it perfectly.
Key Takeaways
- Turn off power at the circuit breaker and verify wiring isn’t live before beginning installation.
- Ensure electrical box supports at least 50 lbs and is securely mounted for safety.
- Connect black to black, white to white, and ground wires securely with wire nuts.
- Adjust the pendant’s height and use a level to ensure proper alignment and even installation.
- Test the fixture after mounting for stability, proper operation, and aesthetic balance.

Kattee Sling Bag for Women, Leather Fanny Packs Crossbody Purse, Small Chest Bag with RFID Blocking, Beige
Top Grain Pebbled Cowhide Leather: Kattee sling bag for women is made of high genuine leather and metal...
As an affiliate, we earn on qualifying purchases.
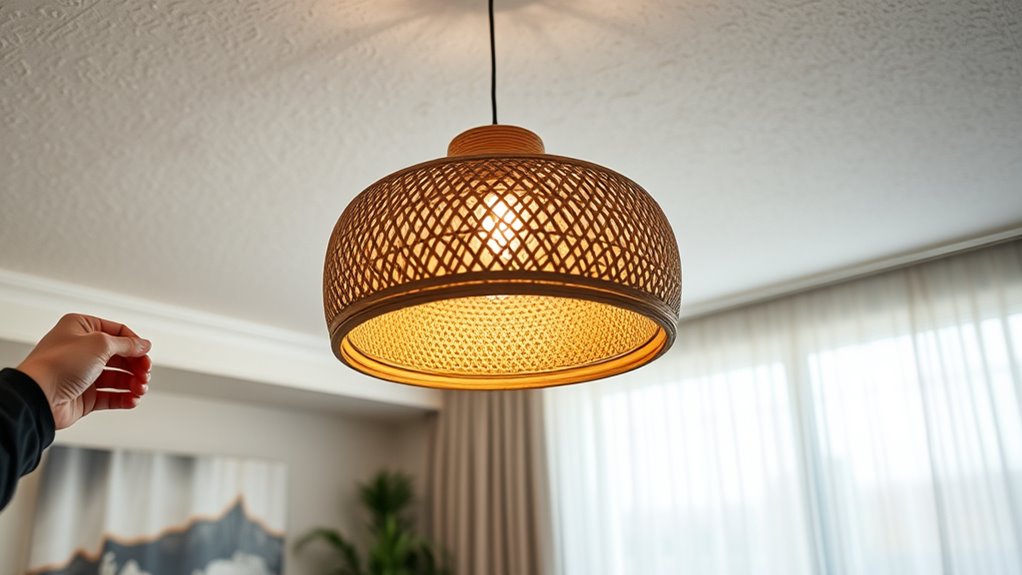
Selecting the Perfect Boho Pendant Lamp for Your Space

To create a cozy boho vibe, choosing the right pendant lamp is essential. When selecting a pendant, opt for natural materials like rattan, bamboo, or jute to enhance the boho aesthetic. Measure your ceiling height carefully to pick a pendant that provides enough clearance without cluttering the space. Look for fixtures with textured or woven shades, which add visual interest and complement your decor style. Stick to earthy tones or neutral colors to ensure your pendant blends seamlessly with your interior palette. Before installation, double-check that the wattage and bulb type are compatible with your wiring and lighting needs. Additionally, incorporating lighting levels can help you achieve the perfect ambiance in your space, making your pendant a functional as well as decorative piece. Considering organic and natural materials in your lighting choices can further enhance the authentic boho theme. By paying attention to these details, your pendant will perfectly elevate your space and bring your boho vision to life.
Amazon Product B0BDL5KWR2
As an affiliate, we earn on qualifying purchases.
Preparing Your Existing Fixture for the Upgrade
Before installing your new boho pendant, you need to prepare the existing fixture properly. First, turn off the light at the circuit breaker to ensure safety. Next, remove the old fixture by loosening the screws holding the canopy and carefully disconnecting the wiring connections. As you do this, note the light wiring configuration: black (hot), white (neutral), and ground wires, so you can reassemble correctly. Then, inspect the ceiling box for stability and compatibility, making sure it can support the weight of your new pendant. Ensure the electrical box is securely mounted and rated for weight capacity to prevent any accidents. Additionally, check the overall city dynamics to guarantee your setup complies with local electrical codes. Also, verify that the installation environment is free of moisture or extreme temperatures, which could affect safety and performance. Finally, clean the electrical box and surrounding area, removing dust or debris to create a clear workspace. This prep guarantees your upgrade is safe, efficient, and ready for the new boho light fixture. Ensuring proper installation preparation helps prevent issues during setup and maintains safety standards.

Fossil Women's Fiona Leather Small Crossbody Purse Handbag, Brown (Model: ZB7668200)
Editor's Notes: For adventures near or far, Fiona's structured design, easy-access pockets and vintage details make it easy...
As an affiliate, we earn on qualifying purchases.
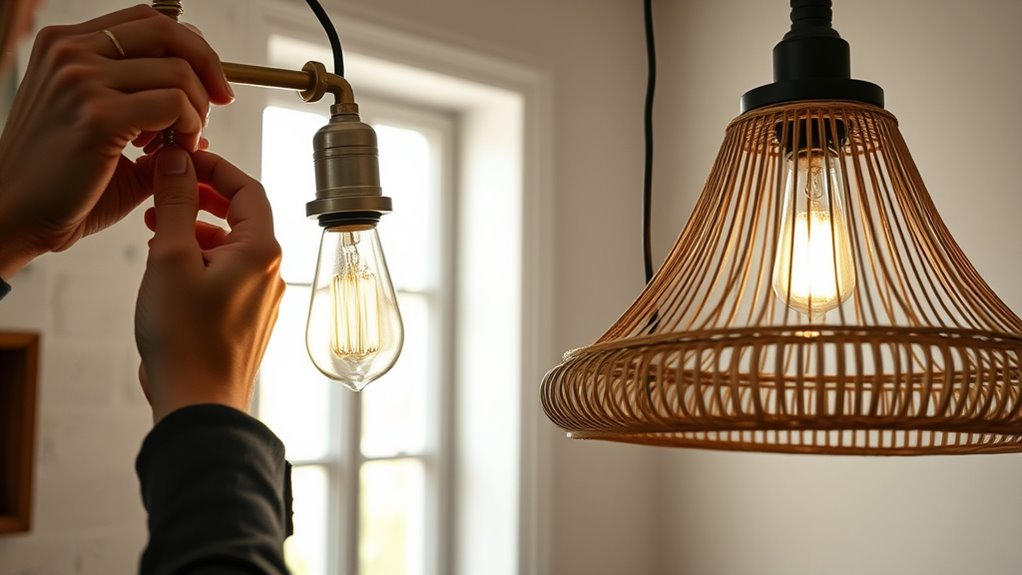
Safely Removing the Old Fixture and Wiring Checks

Before removing the old fixture, switch off the power at the circuit breaker to stay safe. Then, remove the canopy or cover to access the wiring, using a screwdriver if needed. Once exposed, check the wires for damage, corrosion, or looseness, and replace any faulty connections before proceeding. Additionally, inspecting the wiring for oxidation or corrosion can help ensure the safety and longevity of your new fixture. Regular maintenance and checking for electrical issues can prevent potential hazards and improve overall fixture performance. Ensuring your wiring has a wide color gamut can also help with accurate connections and safe operation when installing new fixtures. Also, verifying that the existing wiring matches the Vetted – Halloween Product Reviews standards can help ensure compatibility and safety with your new light fixture.
Turn Off Power
Turning off the power at the circuit breaker is the first critical step before removing an old fixture or checking wiring. This guarantees your safety and prevents electrical shock. To do this effectively:
- Locate your home’s main electrical panel and identify the breaker connected to the ceiling fixture.
- Flip the breaker switch to the OFF position to cut power to the fixture circuit.
- Confirm the power is off by testing the fixture with a voltage tester or multimeter.
- Remove the fixture’s canopy and carefully disconnect the wires, noting how they’re connected for reference.
- Remember that understanding electrical wiring is essential for a safe and proper installation process.
- Familiarizing yourself with home electrical systems can help you troubleshoot and ensure safety during the upgrade.
- Always consult local electrical codes to ensure your work complies with safety standards.
- Using a voltage tester can provide an extra layer of assurance that the circuit is de-energized before handling the wires.
- Consulting professional electricians is advised if you are unsure about any step in the process.
Always double-check that the circuit is de-energized before proceeding. Turning off power is essential to a safe and successful fixture upgrade.
Inspect Existing Wiring
Ever wonder what’s behind that old fixture? Before removing it, turn off the power at the breaker box to stay safe. Use a voltage tester to confirm the wiring isn’t live before touching anything. Carefully remove the fixture’s mounting hardware and gently pull it down to expose the wiring connections. As you inspect the wiring, look for signs of damage, corrosion, or loose connections that may need repair or replacement. Take note of how the wiring is connected—identify the hot, neutral, and ground wires—to guarantee correct re-wiring when installing your new boho pendant lamp. Handling wiring safely is vital for a smooth upgrade, so double-check everything before proceeding. Proper inspection helps prevent electrical issues and guarantees your new fixture is both beautiful and safe. Additionally, understanding the wiring connections can help prevent electrical issues and ensure your installation complies with safety standards. Being familiar with home electrical safety best practices can further safeguard your family during the upgrade process. Recognizing common wiring problems can also assist in troubleshooting any future electrical concerns. Incorporating regular maintenance and inspections can help maintain electrical safety over time.

befen Soft Real Leather Small Crossbody Sling Bags for Women, Ladies Anti Theft Cross Body Bag for Travel with Wide Straps Cognac Brown
Genuine Leather Sling Bag: Crafted from premium top grain pebbled cowhide leather, this befen sling bag boasts durability,...
As an affiliate, we earn on qualifying purchases.
Mounting Your New Pendant Lamp Securely

To securely mount your new pendant lamp, start by verifying that the electrical box can support its weight—ideally at least 50 pounds—to guarantee safety. Proper mounting is essential to prevent accidents or damage. Next, follow these steps:
Ensure your pendant lamp is securely mounted by confirming the electrical box supports at least 50 pounds.
- Attach the mounting bracket securely to the electrical box with the provided screws, ensuring it’s flush and level.
- Thread the pendant’s canopy or mounting plate onto the hardware, tightening firmly to prevent wobbling.
- Adjust the cord or chain length before final mounting to achieve your preferred hanging height, keeping it even.
- Double-check that all wire connections are twisted, secured with wire nuts, and insulated with electrical tape for safety.
- Remember to consider the environmental impact of your lighting choices, opting for energy-efficient bulbs when possible, to support sustainability. Additionally, understanding the weight of pinball machines can be useful if you plan to incorporate heavy fixtures in themed game rooms. Ensuring the secure mounting of fixtures is crucial for safety and durability. Always verify that the mounting hardware and electrical box are compatible with the fixture’s load capacity to prevent any structural issues. Being aware of the security zone info can also help you choose fixtures that are both functional and safe in different areas of your home.
Ensuring Proper Leveling and Alignment

To guarantee your light fixture is level and aligned, start by measuring the height across all pendants or over the table. Use a level tool frequently as you tighten the hardware to prevent tilting. Make small adjustments to suspension rods or cords to achieve perfect symmetry and a clean, professional look. Incorporating fabric decorating markers can also add a personalized touch to your fixture for a unique style. Additionally, understanding lighting design principles can help you create a balanced and aesthetically pleasing arrangement. Remember that attention during installation helps ensure your lighting design remains visually balanced and cohesive.
Measure for Even Height
Before securing your light fixture, ensuring that it’s perfectly level and aligned is vital. Proper measure helps achieve a balanced look and prevents tilting. First, use a level to check that the pendant is horizontal before tightening the hardware. Second, measure from the ceiling to the bottom of the pendant at multiple points around its circumference to confirm equal height on all sides. Third, adjust the length of the chain or rod to maintain consistent height if you’re installing multiple fixtures. Fourth, mark the desired height on the ceiling with painter’s tape as a visual guide. After securing the fixture, double-check the measurements to guarantee it remains even and aligned, making adjustments if needed. Accurate measure guarantees a polished, professional finish.
Use a Level Tool
Using a level tool during fixture installation is essential for ensuring your pendant lamp hangs straight and aligns seamlessly with surrounding elements. Place the level on the fixture’s canopy or horizontal surfaces to check for evenness before tightening the mounting screws. Always verify the level from multiple angles to confirm the fixture is perfectly aligned in both horizontal and vertical planes. If the bubble isn’t centered, adjust the height by repositioning the mounting bracket or rod until it is. Once you’ve secured everything, recheck the level to prevent shifting or tilting caused by movement during installation. Consistently using a level guarantees that your boho pendant lamp looks balanced and professional, avoiding crooked or uneven hanging fixtures that can detract from your space’s aesthetic.
Adjust for Symmetry
Achieving perfect symmetry when installing a pendant light requires careful adjustments to guarantee a balanced look. Start by adjusting the length of the pendant’s cords or rods before tightening, ensuring they are even relative to room features. Use a level tool to verify the fixture hangs straight and maintains proper horizontal alignment. Check that the canopy is flush against the ceiling, preventing tilting of the spray-painted pendant lights. When hanging multiple pendants, measure and mark equal heights on the ceiling for consistent, balanced placement. Fine-tune the tension in the wiring or hardware to correct slight misalignments, ensuring the pendant light hangs perfectly level without rewiring. Proper adjustment creates a stunning lighting design and enhances your lighting ideas with a whole new ambiance.
Connecting Wires Correctly for Safety and Functionality

To guarantee your new light fixture functions properly and remains safe to use, it’s vital to connect the wires correctly. Use connectors to secure wiring and prevent shorts or loose connections. Always turn off the power at the breaker before working on wiring to ensure safety. Match the black (hot) wire from the fixture to the black or brass screw in the ceiling box, and connect the white (neutral) wire to the white or silver screw. Twist the wires together clockwise, then cap them with an appropriately sized wire connector. Attach ground wires to the grounding screw on the fixture and metal box for a continuous safety path. Double-check all connections for tightness and insulation before mounting your fixtures and restoring power.
| Wire Type | Connection Point |
|---|---|
| Black | Black or brass screw in ceiling box |
| White | White or silver screw in ceiling box |
| Ground | Grounding screw on fixture and box |
| Wires | Twisted together, capped with connector |
Adding Support and Adjustments for Aesthetic Balance

Ensuring your pendant hangs perfectly and looks balanced requires careful support and precise adjustments. First, set the height so it’s about 30-36 inches above the floor or table. Use a level during installation to make sure the pendant is aligned and centered with other fixtures or furniture. Next, tighten all mounting hardware and wire connections securely to prevent sway or tilting that can disrupt visual harmony. To maintain balance, distribute the tension evenly across the support wires or chain, avoiding a lopsided appearance. Finally, make small positional adjustments after the initial setup to refine symmetry and achieve the best aesthetic flow. These adjustments are key to creating a polished, cohesive look in your space.
Final Touches: Securing and Testing Your New Pendant Light
Before turning the power back on, double-check that all wiring connections are tight and properly insulated to prevent electrical issues. Securing the pendant fixture correctly is vital for safety and stability. Carefully tighten the mounting screws and canopy to the ceiling junction box, ensuring the fixture hangs level and secure. Use a voltage tester to verify that the power is off before handling any wiring, maintaining safety throughout the process. Once secured, test the pendant light by turning the power back on and flipping the switch. Confirm that it operates smoothly and that the fixture feels stable. Finally, double-check that all decorative elements, like shades and bulbs, are properly installed and functioning. These final steps ensure your boho pendant lamp is both secure and ready to illuminate your space.
Tips for Styling and Complementing Your Boho Pendant With Decor

Once your boho pendant is securely installed and tested, it’s time to think about how to style it within your space. To enhance its earthy vibe, incorporate natural materials like jute, rattan, or wicker into your decor. Pair your new fixture with layered textiles, such as macramé wall hangings or patterned rugs, to create a cohesive bohemian look. Use warm, dimmable bulbs to add cozy ambiance and highlight the pendant’s charm. Complement the pendant with eclectic accessories like vintage ceramics, potted succulents, or woven baskets for visual interest. Opt for wall colors in warm neutrals or muted tones to make your boho pendant stand out as a focal point. These tips help elevate even builder-grade or different types of fixtures, giving your space a fresh, curated feel.
Frequently Asked Questions
How Do You Update Outdated Light Fixtures?
To update outdated light fixtures, start by turning off the power. Remove the old fixture carefully, then connect the new pendant’s wires to the existing electrical box—matching hot, neutral, and ground wires. Choose a fixture that fits your ceiling height and room scale. Secure the pendant firmly, ensuring it’s level. Adding trendy boho pendant lamps with natural fibers or beads instantly refreshes your space with a stylish, modern touch.
Can a Can Light Be Changed to a Pendant Light?
Yes, you can change a can light into a pendant light. First, turn off the power and remove the can light trim. Then, install a retrofit kit that replaces the existing housing with a pendant fixture. Make certain your ceiling and electrical box support the weight and wiring of the new pendant. Follow the kit instructions carefully, and if needed, consult an electrician to ensure safety and proper installation.
Can You Just Change the Shade on a Pendant Light?
You can often change the shade on a pendant light, but don’t just assume it’s a walk in the park. Check if your fixture has a removable shade or a design that allows swapping out covers easily. Make sure the new shade fits the socket size and mounting method. Always turn off the power first—safety comes first—and follow the manufacturer’s instructions to guarantee a smooth, successful upgrade.
How Do You Change a Light Fitting Pendant?
To change a pendant light fitting, start by turning off the power at the breaker. Remove the existing fixture carefully, noting how the wires connect. Disconnect the wires and detach the fixture from the ceiling mount. Connect the new pendant’s wires to the ceiling wires—black to black, white to white, and ground to ground. Secure everything, restore power, and test the new pendant to make sure it’s working properly.
Conclusion
Upgrading your light fixture is like giving your space a fresh breath of air—bringing new energy and style. With the right boho pendant lamp, you’ll create a cozy, inviting atmosphere that reflects your personality. Just take your time, follow the steps, and trust your instincts. Before you know it, you’ll have a stunning centerpiece that ties your decor together like a perfectly tuned symphony. Your space is now shining brighter than ever!