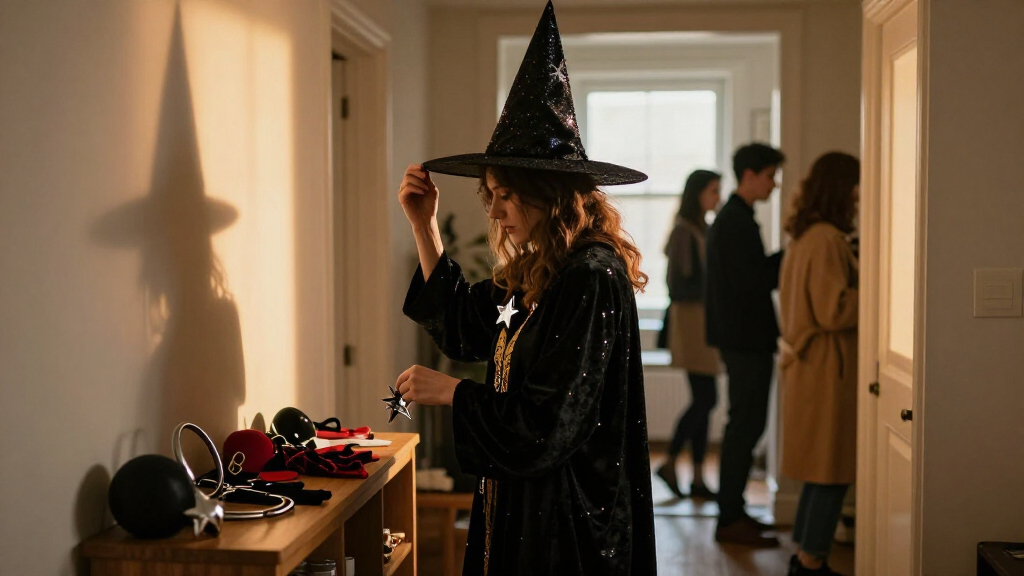
Complete a Halloween costume with accessories that match the character, fit the wearer, and stay comfortable and safe during the event. This guide is for beginners assembling a costume from items they own or making simple additions by hand. Allow 1-3 hours, depending on how many accessories you need and whether paint or adhesive must dry.

Get your wardrobe favorites delivered free with Prime
- Fast, free delivery on millions of items
- Prime Video, Amazon Music and more included
- Member-only deals all year
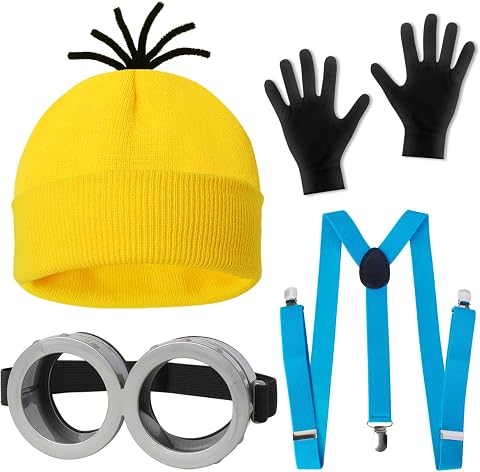
CONGRU 4-Piece Halloween Costume Accessory Set for Adults
- ✔ Included items: Yellow beanie, blue suspenders, goggles, and one pair of black gloves
- ✔ Fabric: Polyester
- ✔ Fit: One size fits most; described for adults and children

U-Zomir Cheetah Costume Set for Women
- ✔ Included items: Cheetah ears headband, clip-on tail, leopard-print bow tie, and temporary face tattoos
- ✔ Material: Polyester
- ✔ Headband fit: Elasticized to fit most head sizes
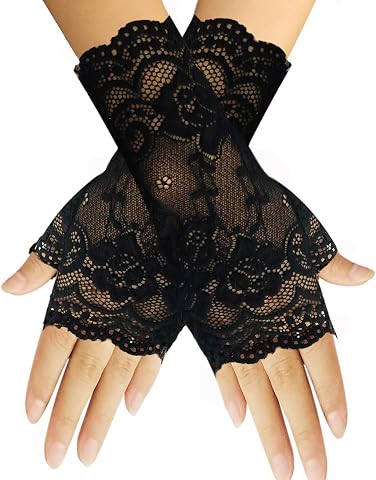
Monochef Women’s Short Lace Fingerless Gloves
- ✔ Quantity: One pair
- ✔ Material: Lace
- ✔ Length: Approximately 18 cm / 7.1 inches
You will plan the look, select suitable materials, assemble or adapt the accessories, and test the finished outfit before leaving. The main points to watch are sharp or heavy parts, restricted vision or movement, loose attachments, and materials that need extra drying time.
Difficulty: Beginner | Time: 1-3 hours
What You’ll Need
Tools & Materials:
- Costume clothing or a reference image
- Paper and pencil for a short accessory list
- Scissors
- Tape measure or ruler
- Needle and thread, fabric-safe adhesive, or hook-and-loop fasteners
- Cardboard, felt, fabric, foam, or other suitable craft materials
- Non-toxic paint or markers, if decorating
- Mirror and good lighting
Knowledge:
- Basic measuring and cutting
- Basic hand sewing or safe use of craft adhesive
- Ability to check whether an accessory fits and allows normal movement
Choose materials suitable for the wearer’s age and the event. Ask a responsible adult to supervise children using scissors, hot glue, small parts, or other tools. Check venue rules before bringing prop weapons, masks, or items that could be mistaken for real weapons. Follow product labels for adhesives and paints, including ventilation and drying time.
CONGRU 4-Piece Halloween Costume Accessory Set for Adults
The CONGRU set earns our top spot because it covers more of the costume-building job than either alternative. A yellow beanie, blue suspenders, goggles, and black gloves create a coordinated visual direction straight out of the package, so we can add simple clothing rather than search for several separate accessories. Compared with Monochef’s gloves, this is much closer to a ready-made character look; compared with U-Zomir, it is less tied to one animal theme and may be easier to adapt for a playful or performance-style outfit.Its practical advantage is that some pieces can be adjusted: the goggles have an adjustable strap, and the suspenders use three metal clips and adjustable length. That gives us more room to tune the fit than a bundle relying entirely on fixed accessories. The beanie and gloves are stretchy, but one size fits most is still a compromise, especially when the set is described for both adults and children. The product details do not specify exact dimensions, so we should not assume every piece will sit comfortably on every wearer.This is our strongest choice when convenience and a cohesive set matter more than a highly specific costume concept. It does not include clothing, and the goggles are plastic, so buyers seeking a premium-looking or highly detailed character build may want to add their own pieces. Still, as a starting point, it provides more outfit-defining elements than the lace gloves and a more general-purpose theme than the cheetah kit.
Pros:
- Four coordinated pieces provide a more complete starting point than standalone gloves.
- Adjustable suspenders and goggle strap allow some fit customization.
- Stretchy beanie and gloves make the set easier to share across some wearers.
- The pieces can support parties, cosplay, and performances.
Cons:
- One-size sizing may not suit every adult or child.
- The set supplies accessories rather than a complete clothing outfit.
- Plastic goggles may not appeal to shoppers seeking a refined or realistic finish.
Best for: Shoppers who want several coordinated accessories for a quick adult or child dress-up outfit, cosplay look, party costume, or performance.
Not ideal for: Anyone who needs exact sizing, wants a polished character-specific costume, or prefers to choose every accessory separately.
Bottom line: We recommend the CONGRU set when a flexible, multi-piece costume shortcut matters more than exact sizing or a narrowly defined theme.
“We recommend the CONGRU set when a flexible, multi-piece costume shortcut matters more than exact sizing or a narrowly defined theme.”
U-Zomir Cheetah Costume Set for Women
When we already know we want an animal-themed Halloween look, the U-Zomir set is more focused than CONGRU’s general costume pieces. It groups cheetah ears, a clip-on tail, a leopard-print bow tie, and temporary face tattoos, giving us several matching cues without asking us to build the theme accessory by accessory. The tail clips on and off, which is useful if we want to remove it during a meal or change the outfit after the party. By contrast, Monochef’s lace gloves are decorative but do not point toward a particular character.The set’s appeal depends on being comfortable with its specific look. It is a better fit for a cheetah, feline, or animal-party concept than for a broad Halloween wardrobe, whereas CONGRU’s goggles and suspenders can be interpreted in more than one way. The elasticized headband is intended to fit most head sizes, but the listing does not provide a detailed measurement; buyers who need a precise fit should keep that limitation in mind.There is also a little more preparation involved than the other picks. The temporary tattoos need water and a 15–20 second wait, so they are not quite as immediate as putting on gloves or a headband. The accessories are hand-wash only, and the tattoo design is a temporary addition rather than a reusable part of the costume. Choose this set for a coordinated animal look, not as the most adaptable bundle in the lineup.
Pros:
- Four coordinated accessories make the animal theme clear.
- Clip-on tail is easy to attach and remove.
- Elasticized headband is designed to fit most head sizes.
- Temporary tattoos add a face-detail option without requiring costume makeup.
Cons:
- The theme is more specific than the CONGRU set or standalone lace gloves.
- Temporary tattoos require water and a 15–20 second application wait.
- Hand-wash-only care may be less convenient after repeated wear.
Best for: Women building a cheetah, feline, or animal-themed Halloween outfit who want matching head, tail, neck, and face accents.
Not ideal for: Shoppers seeking a general-purpose accessory kit, avoiding temporary tattoos, or needing detailed headband sizing information.
Bottom line: We would choose U-Zomir over the other picks when a coordinated cheetah look is the goal, but not when versatility is the priority.
“We would choose U-Zomir over the other picks when a coordinated cheetah look is the goal, but not when versatility is the priority.”
Monochef Women’s Short Lace Fingerless Gloves
Monochef takes the opposite approach to the two themed bundles: it supplies one deliberate accent, not a near-ready costume. The short fingerless lace design can finish a vintage, gothic, theatrical, or formal Halloween outfit while leaving the fingers exposed. That can be useful when we want a dressier character detail without covering the hands, but it means the rest of the costume has to do the visual work. For a first-time costume builder, CONGRU offers more immediate outfit direction; U-Zomir is more helpful if we want a clearly recognizable animal theme.At approximately 7.1 inches long, these gloves are a compact accessory rather than long opera-style gloves. The lightweight lace and stretchy one-size construction are intended to make them easy to wear across different occasions, but the product information cautions that one size may not suit every hand shape. Because the fingers are open, they are also not the pick for warmth or full hand coverage. We should think of them as styling pieces rather than practical gloves.The tradeoff is care and completeness. They are a single pair and require hand washing in cold water with mild lotion, then hanging to dry. That is more upkeep than a simple disposable accent, and they cannot match the outfit-building breadth of either four-piece set. Their strength is restraint: if our costume already has a strong dress, jacket, or character silhouette, the lace detail may be all we need.
Pros:
- Fingerless design leaves fingers free while adding a formal lace accent.
- Lightweight, breathable construction suits dress-up and cosplay styling.
- Short 7.1-inch length works as a restrained accessory rather than a full arm covering.
- Stretchy one-size construction is designed to accommodate many hand sizes.
Cons:
- A single pair does not create a complete costume look.
- One-size fit may not work for every hand shape.
- Hand washing and hang drying require more care than a low-maintenance accessory.
Best for: Shoppers who already have a costume outfit and want a lightweight lace detail for a vintage, gothic, formal, or theatrical look.
Not ideal for: Anyone building a costume from scratch, seeking hand warmth or full coverage, or wanting machine-washable accessories.
Bottom line: We recommend Monochef when an existing Halloween outfit needs a delicate finishing touch, not when we need a costume kit.
“We recommend Monochef when an existing Halloween outfit needs a delicate finishing touch, not when we need a costume kit.”
As an Amazon Associate we earn from qualifying purchases.
Before You Start
Set out the costume clothing and decide where and when it will be worn: a party, school event, outdoor trick-or-treating, or a performance. Make a short list of the accessories needed to make the character recognizable; do not add pieces just to fill space. Check the weather and whether the wearer will need a coat, gloves, or comfortable shoes. Plan accessories around those needs so they do not snag, block visibility, or come off when layered clothing is added.
Use soft, lightweight, non-sharp materials. Avoid real blades, pointed edges, small detachable parts for young children, and anything that can wrap tightly around the neck. Do not rely on a mask that limits peripheral vision for walking outdoors. If paint or glue is involved, test it on a scrap of the same material and allow the full label-specified drying time.
Step-by-Step Instructions
Step 1: List the accessories the costume needs
Put on or lay out the main costume and identify the two or three details that make the character easy to recognize. Write down only those items, such as a hat, badge, belt, cape, wand, tail, or jewelry. Mark each item as one you already own, can adapt, or need to make.
Choose accessories that work together in color, shape, and style. If the costume is for a child or an outdoor event, favor pieces that are easy to see and do not need constant adjustment.
Tip: Use a reference image if you have one, but treat it as a guide rather than a requirement. A few clear details usually work better than many awkward pieces.
Check: You have a short list of accessories, and each item supports the same costume idea.
Step 2: Check fit, movement, and event needs
Try on the costume clothing and mark where each accessory will sit. Measure the wearer if an item needs a specific length or circumference. Check that hats stay on without squeezing, belts do not restrict breathing, and straps do not rub or tighten around the neck.
Have the wearer walk, sit, raise both arms, bend, and turn their head while wearing the planned pieces or temporary paper mock-ups. For outdoor use, check that the outfit still works with a coat and that the wearer can see the ground and other people.
Tip: Do not test a mask only while standing still. If it blocks the sides of the wearer’s view, use face paint or a headband accessory instead.
Check: The wearer can walk, sit, see, and move their arms without an accessory slipping, catching, or causing discomfort.
Step 3: Choose materials and attachment methods
Select lightweight materials that suit each item. Felt and fabric work for soft pieces; cardboard or craft foam can form badges, crowns, and props; existing clothing or accessories can often be decorated instead of replaced. Use rounded edges and cover cut edges with tape, fabric, or a smooth finish.
Choose an attachment that fits the garment: sew fabric pieces, use fabric-safe adhesive where appropriate, or use hook-and-loop fasteners for removable items. Keep pins, staples, and exposed wire away from skin. Check that the attachment will hold through normal movement without damaging a borrowed garment.
Tip: Make a small test patch before applying paint or adhesive to the finished item. Some products stain fabric, melt foam, or leave a stiff area.
Check: The materials are light, have no sharp or exposed edges, and can be attached securely to the costume.
Step 4: Make or adapt each accessory
Cut each piece to the measured size, then round corners and smooth edges before decorating. Add color and recognizable details with markers, fabric, or suitable paint. Keep the design simple enough to read from a short distance, and leave a clear area for fastening if the accessory attaches to clothing.
For props, make a soft or flexible version rather than using a real object with a sharp edge. For a badge or belt decoration, attach it to a stable base so it does not fold or twist. Let every painted or glued part dry as directed before handling or wearing it.
Tip: Do not rush drying by wearing the piece while it is tacky. It can transfer color to clothing or separate when bent.
Check: Each accessory has the intended shape and color, and the decoration is dry and does not rub off when gently touched.
Step 5: Attach the accessories and check their security
Fasten each accessory to the planned location. Sew through a sturdy area of clothing when sewing is appropriate, or apply adhesive according to its label and hold the parts together for the stated time. Attach removable items with fasteners that cannot scratch the wearer.
Gently tug each piece and move the garment as it will be worn. Reposition anything that swings into the face, drags on the ground, catches on sleeves, or pulls the clothing out of shape. Keep long cords and straps away from the neck and moving equipment.
Tip: If an item needs to be removed for sitting, eating, or walking safely, make it easy to detach and reattach without tools.
Check: The accessories stay in place during a gentle tug and ordinary movement, with no sharp fasteners or loose hanging parts.
Step 6: Do a full costume rehearsal
Put on the complete costume, including shoes, outerwear, and every accessory. Spend several minutes walking, turning, sitting, bending, and using the hands as the wearer will during the event. Check visibility, hearing, balance, heat, and whether the wearer can remove urgent items without help.
Look in a mirror and inspect the costume from the front, sides, and back. Fix pieces that cover the eyes, drag, block hand use, or come loose. Pack a small repair kit with spare fasteners, safety scissors for an adult to use, and matching thread or tape when the event is away from home.
Tip: For trick-or-treating, test the outfit in low light and add reflective details to clothing or a bag without covering important costume features.
Check: The wearer can move safely and comfortably, the costume reads clearly, and every accessory remains attached through the rehearsal.
Common Mistakes to Avoid
- Adding too many accessories until the costume becomes heavy or difficult to move in. — Keep the list focused on a few details that make the character recognizable. Remove any piece that gets in the way or adds no clear visual value.
- Using sharp, rigid, or realistic props that may injure someone or be mistaken for a real weapon. — Use soft, lightweight craft materials with rounded edges, and check event rules before bringing props.
- Attaching decorations before checking whether the adhesive or paint suits the material. — Test a scrap first, follow the product label, and allow the full drying time before wearing the item.
- Skipping a complete try-on until the day of the event. — Rehearse in the full outfit, including shoes and outerwear, and test walking, sitting, vision, and attachment strength.
Troubleshooting
Problem: An accessory keeps falling off or twisting out of position.
Solution: Remove it and check whether the attachment is on a stretchy, thin, or slippery area. Move the fastener to a sturdier spot, add a second attachment point, or switch to a more suitable method such as sewing or hook-and-loop tape. Retest with movement.
Problem: Glue or paint remains tacky or transfers onto the costume.
Solution: Stop handling the piece and place it in a ventilated area. Follow the product label for drying or curing time; do not wear it while tacky. If it remains sticky after the stated time, remove or replace the finish with a product compatible with the material.
Problem: The costume looks right but limits vision or movement.
Solution: Remove or reshape the obstructing accessory. Replace a restrictive mask with face paint or a headband piece, shorten trailing parts, and repeat the movement test before wearing the outfit.
Problem: A decoration scratches skin or catches on clothing.
Solution: Take the item off and cover or smooth the rough edge. Remove exposed wire, pins, or staples, and secure loose ends with a soft material. Recheck it against skin and fabric before putting it back on.
What Success Looks Like
The finished costume has a small set of coordinated accessories that make the character recognizable. Every piece is dry, lightweight, securely attached, and free of sharp edges or risky loose parts. During a full rehearsal, the wearer can see, hear, walk, sit, bend, and use their hands comfortably, and the accessories stay in place without snagging or dragging.
Next Steps
Before the event, check the forecast and add a coat, reflective details, or a small repair kit if needed. Keep spare adhesive or fasteners packed, but do not use products on the wearer’s skin unless their label permits it. After the event, remove accessories gently, clean them according to their materials, and store reusable pieces in a labeled container. Repair loose seams or fasteners before storing so the accessories are ready for another use.
Frequently Asked Questions
How many accessories should I use?
Start with two or three details that clearly identify the character. Add another only if it improves the look without making the costume heavy, hard to move in, or difficult to see through.
What are good last-minute costume accessories?
Adapt safe items already at home, such as a scarf, hat, belt, fabric badge, or cardboard emblem. Avoid rushed pieces that need wet glue or paint; use materials that are already dry and can be attached securely.
How can I make a costume prop safer for a child?
Make it from soft, lightweight material, round and cover all edges, and avoid small detachable parts. Do not use real blades, sharp sticks, long neck cords, or objects that could be mistaken for real weapons. Follow the event’s prop rules.
Can I use a mask for trick-or-treating?
Use one only if the wearer can see clearly to the sides and toward the ground, breathe comfortably, and hear nearby people. If the mask restricts vision or airflow, choose face paint or a headpiece that leaves the face open.
Fall Picks
fall essentials
As an affiliate, we earn on qualifying purchases.