
To get a fast refund on shipping damages, photograph the entire package from multiple angles, showing any dents, tears, or crushing. Take close-ups of damaged areas, labels, barcodes, and shipping info with good lighting and steady hands. Include context shots that show how the package is handled and protected. Organize and store these photos systematically, avoiding blurry or unclear images. Keep these tips in mind to strengthen your claim—more details follow to help you succeed.
Key Takeaways
- Photograph the entire package from multiple angles, highlighting dents, tears, or crushing.
- Capture close-up images of visible damage, including cracks, scratches, or broken seals.
- Include clear shots of shipping labels, barcodes, and tracking info for verification.
- Document packaging materials and surrounding environment to demonstrate protective measures.
- Organize photos systematically with descriptive filenames for quick reference during claims.
Why Proper Documentation Is Critical for Shipping Damage Claims

Proper documentation is essential when filing shipping damage claims because it serves as proof of the item’s condition before and after transit. Start by securely keeping packaging materials, as they can demonstrate how well the item was protected during shipping. Take note of any visible damage to boxes, cushioning, or wrapping, which can indicate mishandling. Always include close-up shots of shipping labels to verify recipient details and shipping information, ensuring your claim matches the carrier’s records. Accurate documentation helps establish the cause of damage and supports your case for compensation. Without proper records, your claim may face delays or denial. So, ensure you retain all packaging materials and clearly photograph labels and damages immediately upon receipt. This streamlined process simplifies the claim and increases your chances of a fast refund. Additionally, documenting the entire shipping process can help prevent future issues by providing a clear record of the item’s journey, including any shipping conditions that may have contributed to damage. Taking photos of the item at multiple stages can also help identify potential handling errors, especially when combined with detailed documentation of packaging to support your claim. Regularly reviewing shipping procedures can further enhance your ability to avoid damages in the future.
How to Take Clear Photos of the External Packaging

Capturing clear photos of the external packaging is essential for documenting shipping damage effectively. Start by photographing the entire package from multiple angles to capture all sides. Make sure the packaging materials are visible, showing any dents, tears, or crushing. Focus on close-up shots of areas with noticeable damage. Include the shipping labels in your photos, ensuring they are legible and intact, as they contain vital tracking information. Keep the lighting bright and even to avoid shadows or glare that can obscure details. Use a steady hand or a tripod if possible to prevent blurriness. Additionally, documenting [proper documentation techniques] helps ensure your claim has strong visual evidence. These clear, detailed images will help prove the condition of the package upon receipt and support your claim for a fast refund. Being aware of common shipping issues can also help you identify damage more accurately.
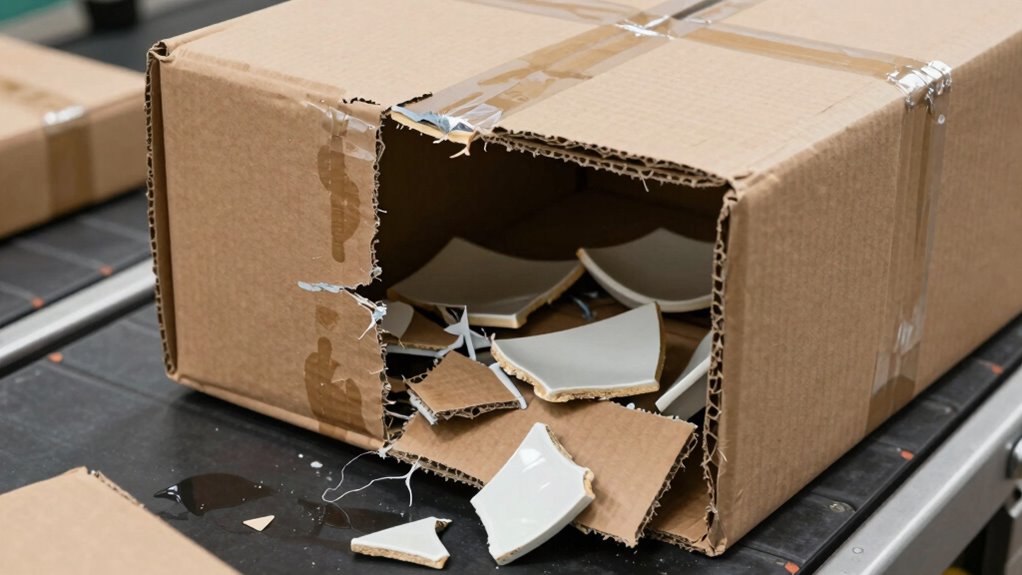
What Types of Damage to Watch for When Inspecting Your Package

When inspecting your package, it’s important to recognize common types of damage that may have occurred during transit. Look for cracks, dents, or crushed areas on the exterior, especially on fragile items like glass or ceramics. Pay close attention to the packaging for signs of mishandling, such as torn boxes or broken seals. Water damage is another critical issue—check for dampness, staining, or warping, which can indicate exposure to moisture. If your package shows signs of water intrusion, inspect the contents carefully for mold, rust, or warped materials. Damage to fragile items can be subtle, so examine each item thoroughly for chips or scratches. Ensuring proper filtration and pump protection during the handling process can help prevent some types of damage. Additionally, understanding the European Cloud Server standards can help you identify if the packaging has been compromised during transit. Proper handling procedures and adherence to shipping standards are essential for minimizing damage. Implementing smart monitoring during transit can also alert you to potential issues early on. Recognizing the importance of attention to detail in assessing damage helps ensure thorough documentation of issues. Identifying these issues early helps you document the damage properly, increasing your chances of a fast refund.
How to Photograph Close-Ups of Damage to Contents

To effectively document damage, start by using proper lighting to highlight details and avoid shadows. Take photos from multiple angles to give a clear view of the affected area. Make sure your focus is sharp on the damage itself to capture all the important details. Additionally, include a timeless outdoor wisdom element by capturing images that clearly show the extent of the damage for faster processing. Remember, accurate documentation can significantly speed up your refund process by providing clear evidence. Incorporating standardized photography techniques such as consistent framing and focus can further ensure clarity and uniformity in your images. Ensuring your workspace setup facilitates good lighting and stability can help you achieve these professional standards.
Use Proper Lighting
Proper lighting is essential for capturing clear, detailed close-up photos of damage to your items. Good lighting reveals the extent of the damage and prevents shadows from obscuring details. Use natural light whenever possible, positioning the item near a window. If natural light isn’t available, employ lighting techniques like softbox lights or diffusers to create even, shadow-free illumination. Guarantee your camera equipment is steady, and adjust the exposure settings to avoid overexposure or underexposure. Avoid using the camera’s built-in flash, as it can create harsh reflections or shadows that hide damage. Proper lighting helps produce high-quality images that clearly document the damage, making it easier to process your refund quickly. Always check your photos to confirm the damage is visible and well-lit before submitting. Additionally, consider free floating techniques to prevent camera shake and ensure sharp images.
Capture Multiple Angles
Capturing multiple angles of damage guarantees you thoroughly document all affected areas for your claim. Take close-up shots from different perspectives to show the extent of harm. Focus on damaged contents, packaging materials, and the shipping carrier’s packaging. This comprehensive approach helps clarify how the damage occurred and whether proper packaging was used. Use your camera or smartphone to photograph the scene from various viewpoints: front, side, top, and at different distances. Include images of any labels or shipping labels that might help verify the shipping process. Additionally, accurate documentation can significantly expedite your refund process by providing clear evidence of the damage and the packaging quality. Ensuring you photograph shipping damage thoroughly will help avoid delays in your claim resolution. Proper insurance claims often rely on detailed visual evidence to speed approval and reimbursement, especially when combined with digital recordkeeping for easy reference.
Focus on Damage Details
When photographing close-ups of damage to contents, focusing on clarity and detail is vital. Capture images that highlight specific areas affected by poor package handling, such as dents, tears, or crushed items. Use good lighting and steady shots to make certain every detail is visible. Show the extent of the damage clearly to demonstrate carrier responsibility and the impact of rough handling during transit. Include surrounding packaging or labels to provide context, but prioritize close-ups of the actual damage. These detailed photos can help expedite your refund process by clearly illustrating how the contents were compromised. Remember, the more precise and thorough your images are, the easier it will be for the carrier or seller to assess liability and resolve your claim quickly. Additionally, focusing on damage documentation can strengthen your case when filing a claim or dispute. Paying attention to visible signs of mishandling can further support your claim by showing evidence of improper handling during transit. Proper damage documentation also ensures that your claim has the necessary proof to be processed without delays. Incorporating proper photographic techniques can significantly improve the clarity and impact of your damage evidence, making your claim more compelling.
Why Including Context Shots Can Strengthen Your Damage Claim
Including context shots helps establish where the damage occurred, making your claim clearer. These photos prevent confusion by showing the overall condition of the package and its surroundings. When you provide this broader view, your claim becomes stronger and less open to misinterpretation.
Establishs Damage Context Clearly
To strengthen your damage claim, it’s essential to establish a clear context for the damage. Including wide-angle or background shots helps show how the cargo was secured and whether proper damage prevention measures were in place. This context can reveal if cargo security protocols were followed, reducing ambiguity.
Consider capturing:
- The condition of the packaging and pallets
- The placement of items within the shipping container
- Any visible signs of improper cargo security
- The surrounding environment during inspection
- The overall condition of the shipping container or vehicle
These shots help clarify how the damage occurred and support your case for fast refunds. Clear context demonstrates you took proper precautions, making your claim more credible.
Prevents Photo Misinterpretation
Adding context shots is essential because they prevent misinterpretation of the damage. When handling fragile items, clear photos of the overall package and its condition help show how the damage occurred. Document interior damage by including shots of the contents inside the box, revealing whether the item was crushed or broken during transit. Without these context shots, insurers might misjudge the severity or cause of the damage, leading to delays or denials. Including images of the entire package, labels, and how the item was packed provides a complete story. This extra detail clarifies your claim and speeds up the refund process. Always capture both close-up damage photos and wider shots to strengthen your case and avoid confusion about what was damaged and how.
How to Capture Photos of Labels, Barcodes, and Shipping Labels
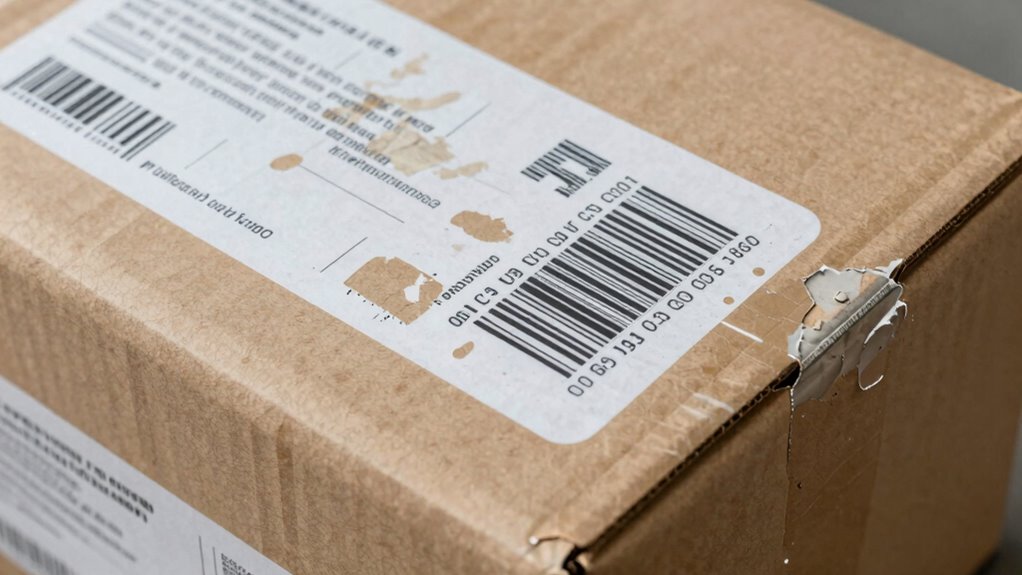
Capturing clear photos of labels, barcodes, and shipping labels is essential for documenting shipment details and resolving potential disputes. To ensure label clarity and barcode accuracy, follow these tips:
- Use natural light or a well-lit environment to avoid shadows and glare.
- Keep the camera steady, or use a flat surface to stabilize your shot.
- Focus directly on the label, ensuring the entire label is sharp and readable.
- Capture close-up shots of barcodes, making sure they are centered and clear.
- Take multiple photos from different angles to cover all relevant details.
Best Practices for Organizing and Storing Your Damage Photos

Organizing and storing your damage photos properly guarantees you can quickly access them when needed and maintain accurate records. Use a consistent storage organization system, like folders labeled by date, shipment, or damage type. Develop a clear photo file naming convention that includes key details such as date, item, and damage description, e.g., “2024-04-27_BoxA_BrokenHandle.jpg.” To envision, picture this table:
| Folder Structure | File Naming | Storage Medium |
|---|---|---|
| April 2024 | 2024-04-27_BoxA_BrokenHandle | External Drive |
| Damaged Items | 2024-04-27_BoxB_CrackedLens | Cloud Storage |
| Shipment Details | 2024-04-27_BoxC_Dent | Local Computer |
| Repair Records | 2024-04-27_BoxD_MissingParts | Backup Drive |
This method guarantees your damage photos are organized, accessible, and easy to reference for efficient refunds.
Common Mistakes to Avoid When Photographing Shipping Damage

When photographing shipping damage, many people make the mistake of taking blurry or poorly lit photos that fail to clearly show the extent of the problem. This can delay your refund process and weaken your case. To avoid this, pay attention to these common mistakes:
- Forgetting to include nearby packaging materials that reveal how the item was protected
- Taking photos from too far away, missing details of the damage
- Failing to capture multiple angles for a thorough view
- Ignoring the involvement of shipping carriers in the damage
- Using poor lighting that obscures important details
Clear, well-lit images that include packaging materials and show damage from various angles are essential. Avoid these mistakes to ensure your photos support your claim efficiently.
Tips for Submitting Clear Photos to Speed Up Your Refund

Clear photos can make or break your refund process, so it’s worth taking the time to get them right. Verify your images clearly show the damaged item along with the packaging materials and shipping labels. Use natural light or bright, even lighting to avoid shadows or blurriness. Capture multiple angles—close-ups of the damage and overall shots of the package—so there’s no doubt about the extent of the damage. Follow the shipping policies carefully; some require specific photo formats or views. Avoid editing or cropping that obscures details. Being precise and thorough speeds up the claim review, reducing delays. Remember, shipping policies often specify what photos are needed, so review them beforehand for best results. Clear, detailed images help ensure a fast refund.
Frequently Asked Questions
How Many Photos Should I Take for a Shipping Damage Claim?
You should take at least 4 to 6 photos for a shipping damage claim, ensuring photo consistency while capturing all angles. Focus on close-ups of damage severity, showing the extent clearly. Include images of the packaging, labels, and any visible damage on the item. This thorough documentation helps verify the damage, speeds up the refund process, and provides a clear record for your claim.
Can I Edit Photos Before Submitting My Damage Claim?
You can generally edit photos before submitting your damage claim, but avoid excessive photo editing or image enhancement that *modifies* the actual damage. Keep the images clear, focused, and true to reality to *guarantee* a smooth claim process. Basic adjustments like cropping or brightness correction are usually acceptable, but do not manipulate the photos in ways that could misrepresent the damage, as this might delay or jeopardize your refund.
What File Formats Are Accepted for Damage Photos?
Think of your photos as clear windows into the damage. You should submit images in JPEG, PNG, or TIFF formats, which are widely accepted. Make certain your photos have high resolution so details aren’t lost—avoid excessive file compression that blurs images. Using these formats and maintaining quality helps expedite your claim process, making it easier for reviewers to see the damage and process your refund swiftly.
Should I Include a Written Description With My Photos?
Yes, including a written description with your photos helps clarify the damage. Make sure your description is clear and concise, highlighting specific issues. Combine this with photos that have good photo clarity and show multiple photo angles to provide a thorough view. This approach makes it easier for the claims team to understand the extent of the damage, speeding up your refund process and avoiding unnecessary delays.
How Soon After Delivery Should I Photograph the Damage?
Think of damage documentation like catching a butterfly—you want to do it quickly before it flies away. You should photograph the damage as soon as possible after delivery, ideally within 24 hours. Timing considerations are vital because prompt photos serve as solid proof, making your documentation timing more effective. This way, you prevent any claims of post-delivery damage and ensure your refund process moves swiftly.
Conclusion
Think of your photos as a map guiding your refund journey; clear, detailed images lead straight to success. When I once missed capturing a damaged box’s label, my claim stalled—lesson learned. Proper documentation is your best tool to guarantee the process runs smoothly. By photographing every detail carefully, you ensure your claim isn’t lost in the shuffle. Remember, a well-documented claim is like a well-marked trail—straightforward and easy to follow.