TL;DR
Placing your rig in another room is the most effective way to reduce noise. Proper treatment and sealing leaks make your closet studio sound better and quieter. Focus on placement, sealing gaps, and using budget-friendly materials for best results.
Ever notice how your closet sounds like a drum when you record? That’s because small spaces reflect sound wildly, creating echo and harshness. But what if the real solution isn’t more foam, but moving your gear out of earshot entirely?
This guide reveals the surprising truth: the best way to tame noise and improve sound quality is to think in terms of placement and sealing, not just absorbing sound. You’ll learn how to set up your closet studio for clarity—without turning it into a soundproof bunker.
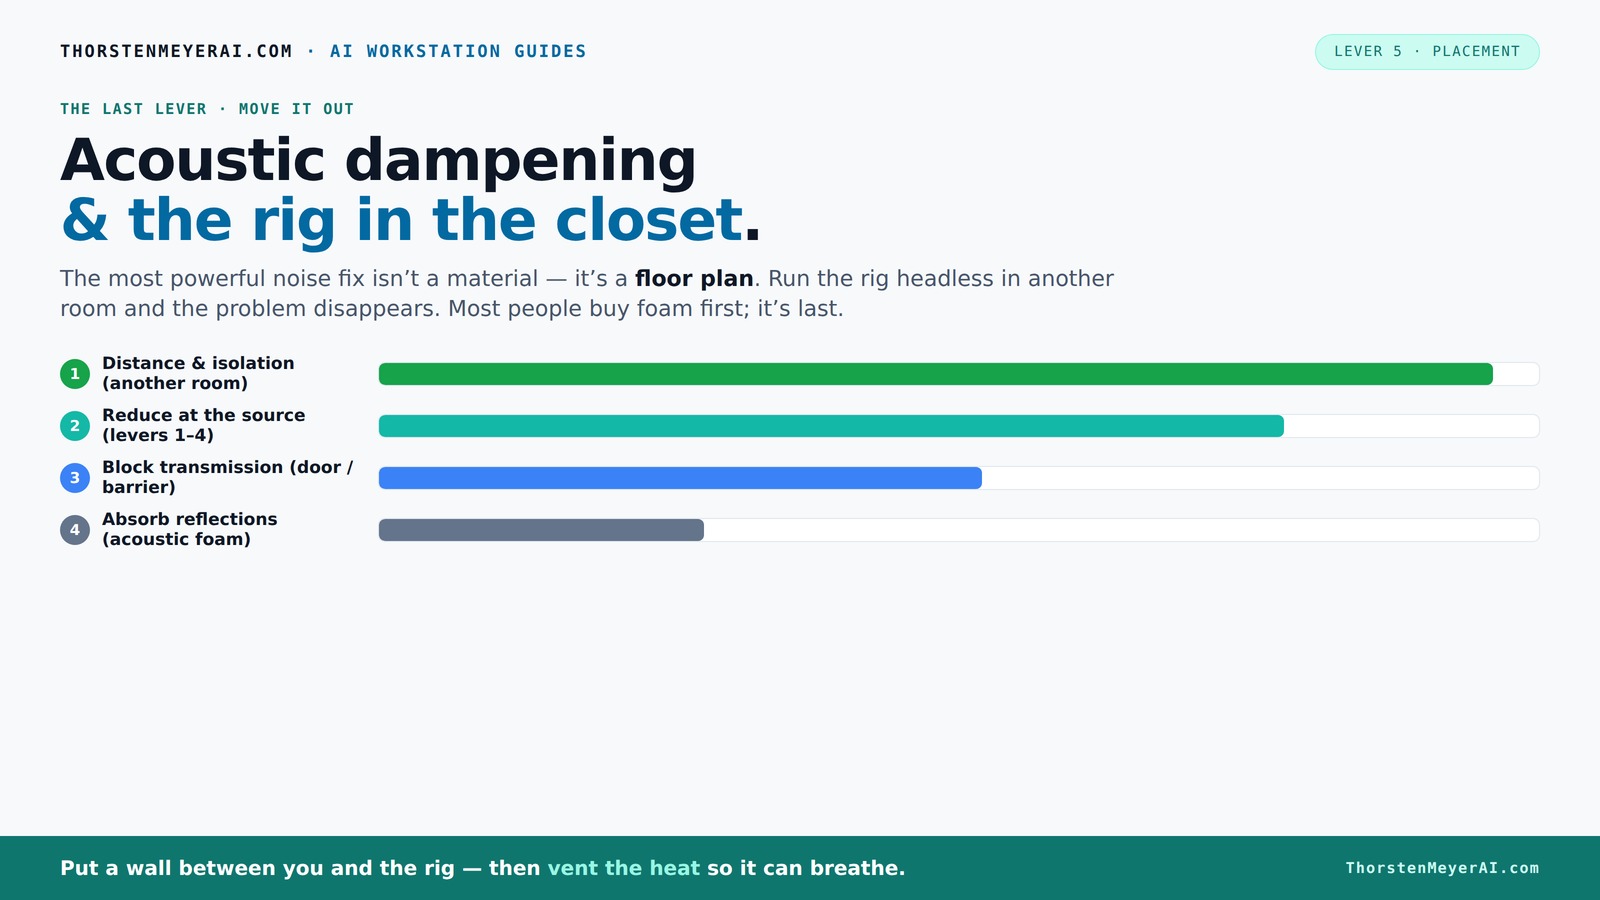
Acoustic dampening
& the rig in the closet.
The most powerful noise fix isn’t a material — it’s a floor plan. A rig you can’t hear because it’s in another room beats any amount of foam. Tap the approaches in Part 1 to see what actually works.
(another room)
(levers 1–4)
(door / barrier)
(acoustic foam)
Contain the noise, not the heat
Key Takeaways
- Moving your rig into another room is the most effective noise reduction method.
- Sealing leaks around doors and gaps boosts sound isolation dramatically.
- Proper placement of acoustic treatment points—especially behind the mic—improves voice clarity.
- Ventilation is critical when placing high-heat equipment in a closet—don’t trap the heat.
- Budget materials like blankets, rugs, and weatherstripping can make a big difference without breaking the bank.

Focusound 52 Pack Acoustic Foam Panels 1" x 12" x 12" Sound Proof Foam Panles Soundproofing Noise Cancelling Wedge Panels for Home Office Recoding Studio with 300PCS Double-Side Adhesive
Soundproofing - Acoustic foam panels triangular grooves structure for better noise absorption, helps to reduce and absorb unwanted...
As an affiliate, we earn on qualifying purchases.
As an affiliate, we earn on qualifying purchases.
Why Acoustic Dampening Alone Won't Fix Your Closet Noise Problem
Acoustic dampening reduces echoes inside your space but doesn’t block sound from leaking out. It’s like softening a drum’s echo but not stopping the drum from beating. For real noise control, you need soundproofing—blocking sound from escaping.
Think of your closet as a mini concert hall. Foam panels can soften the reflections, but if the door leaks sound, your neighbors will still hear every bass drop. You must combine dampening with sealing leaks for true quiet.
Understanding this distinction is crucial because many overlook the importance of sealing gaps, assuming that foam alone will solve their noise issues. In reality, the tradeoff is that dampening improves internal sound quality but does little to prevent sound from escaping, which is essential if you want to keep noise contained or avoid disturbing others. Combining both methods ensures you get a balanced setup—quiet inside and outside the room.

TroyStudio Portable Vocal Booth, Large Foldable Microphone Isolation Shield, Music Recording Studio Sound Echo Absorbing Box, Desk & Stand Use Reflection Filter with Thickened Dense Acoustic Foam
【BASIC INFO】: Inside size after setup: 8'' (L) X 10'' (W) X 12'' (H), large space for various...
As an affiliate, we earn on qualifying purchases.
As an affiliate, we earn on qualifying purchases.
The Single Most Effective Move: Put Your Rig in Another Room
The best way to cut noise is simple: move your rig into another room. If the computer and GPU are in a closet, the sound doesn’t reach your ears. Instead, you access it remotely over the network. Imagine your high-powered workstation living in the basement, while you record in a quiet corner.
This approach turns a noisy problem into a non-issue. As long as your network connection is solid, the physical location of your rig stops mattering. It’s a game changer for small setups.
Choosing this method might involve some tradeoffs, such as potential latency or the need for reliable networking hardware. However, the benefit of drastically reducing noise pollution and preventing overheating in a confined space outweighs these challenges. This separation also allows your workspace to be more flexible, letting you focus on sound quality without the distraction of noisy electronics nearby.

Audimute Soundproofing Acoustic Door Seal Kit - Door Sweep and Seal - (Standard Size)
Includes a Door Seal (3/16" x 1/2" x 25') and a Door Sweep (1/2" x 1.5" x 4').
As an affiliate, we earn on qualifying purchases.
As an affiliate, we earn on qualifying purchases.
How to Make a 'Rig in the Closet' Work Without Overheating
Putting a hot, high-performance machine in a closet is brilliant for noise reduction—if you handle airflow. Sealing it tight traps heat, causing temperatures to climb. That’s like putting a frying pan in a sealed box.
To prevent overheating, you need active ventilation—either a quiet exhaust fan or ducted airflow. A small vent with a fan can keep hot air moving out while drawing cool air in. For serious setups, consider a custom soundproof cabinet with built-in cooling systems. Check out this guide for detailed cooling strategies.
Understanding the tradeoff here is critical: sealing the space for soundproofing increases the risk of heat buildup, which can damage your equipment or reduce its lifespan. Proper ventilation ensures that heat dissipates effectively, maintaining performance and longevity. Small compromises in noise reduction—like adding a quiet fan—are often worth the tradeoff for equipment safety and consistent operation.

Sound Addicted - Studio Monitor Isolation Pads suitable for 6.5, 7 and 8 Inches Large Speakers | Reduce Vibrations and Fits most Stands - Pair | SMPad 8
SMPad 8 is made out of the highest quality acoustical foam (50kg/m^3 density).
As an affiliate, we earn on qualifying purchases.
As an affiliate, we earn on qualifying purchases.
Where to Place Acoustic Treatment for the Best Results
In a tiny closet, the first step is to treat the reflection points—especially behind your microphone and along the wall facing you. This reduces harsh echoes bouncing back into your mic. Use foam panels or blankets for this.
Next, treat the side walls and ceiling to soften reflections. Rugs or soft mats on the floor also help tame footfalls and reduce bouncing sounds. For low-end problems, bass traps in the corners can prevent muddy, boomy sounds—especially in small, parallel-sided closets.
Strategic placement of acoustic treatment is vital because the goal is to control how sound waves behave within such a confined space. Treating only one area might provide some improvement, but neglecting reflection points can leave your recordings sounding dull or overly echoey. In small rooms, every surface reflects sound differently, so understanding how these reflections interact helps you target treatment where it’s most effective. For example, you can learn more about placing acoustic treatment behind the mic to minimize early reflections, while bass traps in corners prevent low-frequency buildup that can muddy your sound. Proper placement ensures that internal acoustics complement your recording goals, giving you clearer, more professional results.
Sealing Gaps and Leaks: Your Secret Weapon
Doors, cracks, and gaps are the Achilles’ heel of any small room. Even tiny leaks let sound escape or enter, ruining your efforts. Weatherstripping around the door frame, acoustic sealant in cracks, and blankets over gaps are quick fixes.
For example, sealing the door with weatherstripping can cut noise transmission by up to 20 dB. Covering the gaps with moving blankets or acoustic curtains adds another layer of sound shield. Remember, a sealed room is a quiet room.
Sealing leaks isn’t just about reducing noise; it also affects internal acoustics by preventing unwanted external sounds from seeping in and causing interference. When you seal gaps, you create a more controlled environment—less external noise, more consistent internal sound. This means your recordings will have fewer disturbances, and your monitoring will be more accurate. The tradeoff is that over-sealing can sometimes make ventilation difficult, so balancing sound isolation with airflow needs careful planning. Using adjustable seals or vents can help you maintain both quiet and proper ventilation, optimizing your space’s acoustic performance.
Budget-Friendly Materials That Actually Work
You don’t need to spend a fortune to get good sound. Heavy blankets, moving blankets, and even thick curtains can absorb reflections and reduce noise. Use them around your mic, on the door, and on reflective surfaces.
Rugs and carpets on the floor prevent bouncing, while foam panels can be bought cheaply online for quick reflection control. Bass traps in corners don’t have to be expensive—DIY versions work well in small spaces. For sealing gaps, weatherstripping is cheap and effective.
Choosing affordable materials often involves understanding their properties—thick blankets and curtains absorb mid to high frequencies, reducing harshness and echo. Rugs and carpets dampen footfall noise and prevent sound bouncing off the floor. DIY bass traps, made from mineral wool or rigid fiberglass, can be highly effective in small spaces without costing much. Weatherstripping seals gaps and prevents sound leaks at a fraction of the cost of professional solutions. The key is strategic placement—placing blankets behind the mic or over the door can significantly improve sound quality without a hefty investment, making these solutions accessible for hobbyists and professionals alike.
Common Mistakes That Kill Your Closet Sound Quality
Thinking foam alone will fix everything. It won’t. Foam absorbs but doesn’t block sound. Also, sealing gaps is often overlooked—leaving tiny leaks that undo all your efforts. Another mistake: neglecting ventilation, which leads to overheating and throttling.
Placing your mic directly against reflective surfaces or ignoring low-frequency buildup can also cause problems. Small rooms amplify bass issues, creating muddy recordings. Always test your setup after each change to spot issues early.
Understanding these common mistakes helps you avoid costly errors that compromise your sound quality. Over-reliance on foam can give a false sense of security, leading to complacency about sealing gaps or managing low frequencies. Neglecting ventilation can cause overheating, risking hardware damage and inconsistent performance. Additionally, poor mic placement—such as placing it too close to reflective surfaces—can cause comb-filtering effects and muddiness. Recognizing these pitfalls allows you to implement a balanced, comprehensive approach—addressing both internal acoustics and external factors—to achieve clearer, more professional recordings.
FAQ: Your Closet Studio Questions Answered
- Is acoustic foam enough for a closet studio? Not quite. Foam helps with reflections but doesn’t block sound from escaping. Combine with sealing leaks for best results.
- Where should I place panels in a closet booth? Focus on reflection points—mainly behind the mic and on the ceiling. Treating these areas yields the biggest improvement.
- Do I need to treat the door, and how? Yes. Weatherstripping and blankets are quick fixes that reduce sound leaks significantly.
- What’s the difference between soundproofing and acoustic treatment? Soundproofing blocks sound from leaving or entering, while acoustic treatment improves internal sound quality.
- Should I use blankets, foam, panels, or bass traps? Use a mix: blankets and foam for reflections, bass traps for low-end issues, and seal gaps for isolation.
Conclusion
Your closet studio’s sound quality hinges on smart placement, sealing leaks, and a bit of ventilation. Moving your rig away from your workspace can cut noise instantly—no fancy foam required.
Treat reflection points carefully, seal gaps thoroughly, and keep heat in check. With these simple steps, you turn a noisy closet into a quiet, professional-sounding space—your voice deserves it, and so do your neighbors.